In this section, you can view, create, and manage all of your bills, whether they come from a purchase order or are entered manually.
You can also create bills from scanned documents (PDF, images) using automatic data extraction. See the Extract from a document and Batch extraction from documents sections below.
If ALIX is connected with Zoho Books and bills are enabled, they will be synchronized.
Note: if the Transfer bill files to Zoho Books configuration is enabled, the files attached to the bill are sent to Zoho Books during synchronization. For more information, see the Zoho Books configurations page.
Note: when a bill is created from a purchase order, each line’s tax is inherited from the purchase order and remains editable. For more information, see the Tax management in purchase orders page.
Create a bill #
- From the menu on the left, choose Purchases -> Bills.
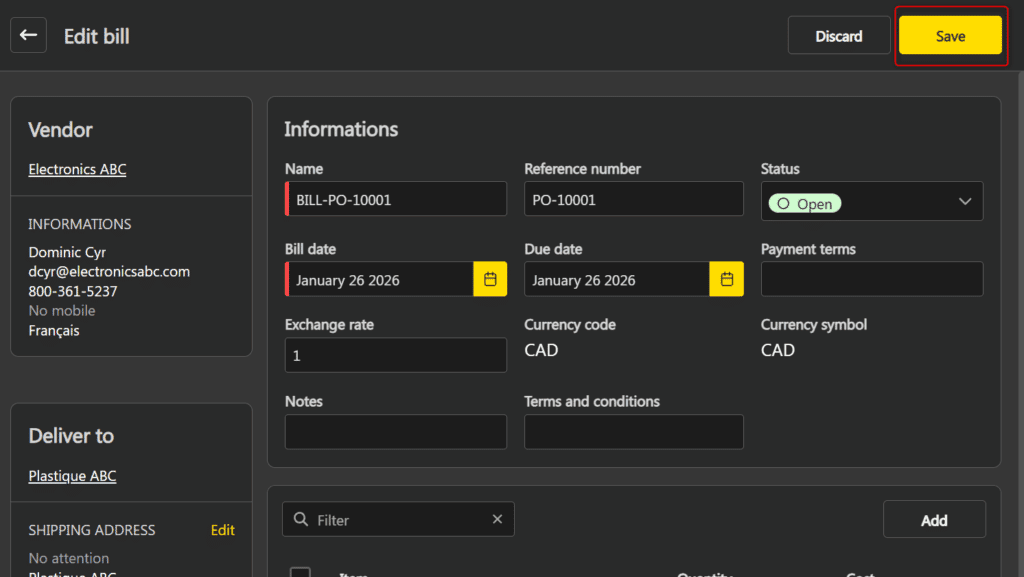
- Click Create bill, or click the desired bill in the list, and then click Edit in the top right.

- Enter the requested information, and then click Save.


Note: The vendor and the site cannot be changed once the bill has been created.
Extract from a document #
ALIX can automatically extract information from a document (scanned bill) to pre-fill the creation form. The document used is automatically attached to the created bill.
Accepted formats: PDF, PNG, JPG, JPEG, TIFF, and WEBP. Maximum size: 50 MB.
- From the menu on the left, choose Purchases -> Bills.
- Click the ▾ arrow to the right of the Create a bill button, then select Extract from a document.

- In the window that opens, drag and drop or select a file.


Note: only one file at a time. Selecting a new file replaces the previous one.
- Click Extract. Processing may take a few moments.
- The creation form opens with pre-filled fields (vendor, date, reference, items). Review and complete the information if needed, then click Save in the top right.
Note: if no data could be extracted from the document, an error message is displayed and the creation form does not open. Make sure the document is readable and try again, or create the bill manually.
Batch extraction from documents #
Batch extraction allows you to create multiple bills from multiple documents in a single operation. Each document successfully processed creates a separate bill with the document automatically attached.
Accepted formats: PDF, PNG, JPG, JPEG, TIFF, and WEBP. Maximum size per file: 50 MB. Maximum 20 files per extraction.
Note: unlike single document extraction, which opens a creation form for review, batch extraction creates bills directly. All required information must be present and readable in the document, otherwise the bill will not be created.
- From the menu on the left, choose Purchases -> Bills.
- Click the ▾ arrow to the right of the Create a bill button, then select Batch extract from documents.

- In the window that opens, drag and drop or select one or more files.


Note: duplicate files are automatically ignored. To remove a file from the list, select it then click the delete button.
- Click Extract.
- The window closes and processing takes place in the background. A progress message is displayed and remains visible even if you navigate to another page.
- Once processing is complete, a message indicates the result: number of bills created, number of failures, and total processed. The created bills appear in the grid.
Note: in case of partial failure (some documents could not be processed), the successfully created bills are kept. You can rerun the extraction for the failed documents or create the corresponding bills manually.
Edit a bill #
- From the menu on the left, choose Purchases -> Bills.
- Click the desired bill in the list, then click Edit in the top right.
- Edit the desired information, then click Save in the top right when you are done.
The following elements cannot be changed:
- The vendor and the site are locked once the bill is created.
- The status of a bill linked to Zoho Books (with an external ID) cannot be changed from ALIX.
Apply a custom unit on a bill line #
-> Available from ALIX 11.24.0. How do I find out the current version?
The custom unit allows recording a bill line in a unit different from the item’s stock unit.
Note: if the line comes from a purchase order, its custom unit is inherited automatically and cannot be edited from the bill. To edit the custom unit, edit it on the purchase order line.
For a manually added line (bill without a source purchase order):
- Open the desired bill, then click Edit in the top right.
- Select the desired line, then click More actions -> Apply a custom unit.

- In the window, fill in the Unit and Format fields, then click Confirm.


As long as the bill is in Open status, the Format is also editable directly in the line grid.
Note: it is impossible to apply or edit a custom unit if:
- the line comes from a purchase order;
- the bill is synchronized with Zoho Books;
- the bill status is no longer Open;
- several lines are selected at the same time.
Price based on weight lines #
-> Available from ALIX 11.24.0. How do I find out the current version?
A bill can contain lines for items configured with Price based on weight.
- If the line comes from a purchase order, it inherits the Unit cost in $ / <weight unit> and the Net weight defined on the purchase order line.
- For a manually added line, the Price based on weight mode, the Unit weight and the Weight unit are inherited automatically from the item. The Unit cost, Net weight and Measure fields are editable, and their changes recalculate the line total.
For more information on weight-based price, see the Buy at price based on weight page.
Delete a bill #
- From the menu on the left, choose Purchases -> Bills.
- Select the bill to delete in the grid.
- Click the delete button.
It is impossible to delete a bill if it is linked to Zoho Books and its status is not Open.
Link shipments to a bill #
-> Available from ALIX 11.24.0. How do I find out the current version?
In view mode, each item line of a bill displays a Shipments counter indicating the number of linked shipments. This counter allows you to view linked shipments, add new ones, or remove them.
Note: the Shipments column is only visible in view mode. It does not appear in create or edit mode.

View linked shipments #
- From the menu on the left, choose Purchases -> Bills.
- Click the desired bill in the list.
- In the Items section, click the Shipments counter on the desired item line.

The Shipments window opens and displays the list of shipments linked to this line. You can use the search bar to filter the results.
Click a shipment number to open the shipment details.
Add a shipment #
- In the Shipments window, click Add.

- In the Select shipments window, check one or more shipments, then click Add.


Shipments already linked to this line and cancelled shipments do not appear in the list. The Shipments counter on the item line is updated automatically.
Remove a shipment #
- In the Shipments window, check one or more shipments.
- Click Delete.


The removed associations disappear from the grid and the Shipments counter is updated automatically.
Note: shipment associations are preserved when you edit a bill (changing the billed quantity or any other field).